Thanks for looking!
Epic stories about removing mold lines and destroying brushes with poor technique.
Sunday, October 27, 2019
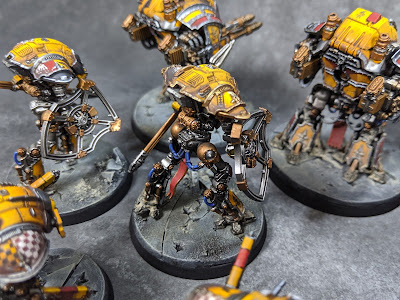
Titanicus Knights Done!
Not much to say here. These are finally done, around 1000k pts of Knights. I'm planning to get more Questoris and Cerastus knights; besides looking cool, they're very fun to play. The Acastus knights aren't very much fun at all; they're too strong, they counter everything and aren't really countered by anything. But they look cool and it's a cool kit, so there's that.
Thanks for looking!
Thanks for looking!
Sunday, September 22, 2019
Converting/Fixing the Primaris Repulsor
I'm pretty excited about this one. When the Repulsor first came out, I can't say I was too thrilled about it. Here's the default model for reference:
It has too many guns, all thrown together on that small turret. There's what, 9 weapons on it? And it's so asymmetrical. It's a bit much, especially for a vehicle that's primarily a transport. In addition, I have two Land Raider Crusaders which have a very unique and recognizable shape and profile, especially iconic for Black Templars:
I was considering including Repulsors in my collections - it's a Land Raider mark after all - but I really wanted to get rid of the turret. And I'm not the first one who's had that idea, although I didn't want to change the rules, just the look.
It finally clicked a few months ago:
- Move the twin Lascannon/Heavy Bolter to sponsons (presumably using Predator sponsons),
- Lower the main turret weapon to where the twin Lascannon/Heavy Bolter used to be,
- Replace the front hull with an assault ramp,
- Hide the stubber(s) somewhere, and go from there.
I started by cutting the front off:
When I tried to try-fit the assault ramp, I saw that it didn't go high enough, so I cut away a bit more. I also cut little slots in the full that snugly accept the two extrusions that are supposed to lift the upper part of the ramp.
Looking good! I intentionally made the assault ramp stand out a little bit so that it's noticeable and more alike to that of a classic Land Raider. I later covered the gaps between the assault ramp and the sides of the hull with some plasticard.
Onto the sponsons. I started doing this using Baal Predator sponsons I had lying around. When I got the actual Predator sponsons in the mail, I noticed that they have a slightly different shell. Oops! So I had to use the Baal Predator sponson frame with normal Predator sponson weapons. I think it looks good because Baal Predator sponson frames have a little outline that I could use to cover up cutting mistakes. Anyway:
Next, to I had to cover the turret hole with something. I cut a round bit of plasticard, glued it in, filled the gap and sanded very carefully and very long, until there's no evidence that I had patched a huge hole. Then I threw a few bits around until it looked adequately busy.
I had to remove some parts of the inside of the hull to make room for those magnets and their sprue mounts:
And that's it! Here are some other pics of the finished model:
(the small gatling cannon wasn't fully assembled when this pic was taken; I literally forgot to finish it until I looked at what I had on the sprue as I was packing it)
It turned out pretty good I think. I have a Repulsor Executioner kit too, ready for the same sponson treatement, that would hopefully result in a cleaner and more symmetrical turret. But that one will probably not have an assault ramp on the front.
Anyway, hope this inspires some of you. It wasn't too much work and it was a lot of fun. The most difficult part, honestly, was finding Predator sponson bits on Ebay - those things are rare.
Thanks for looking!
Labels:
Conversion,
Land Raider,
Muhreens,
Repulsor,
Tutorial
Friday, July 5, 2019
First attempt at freehand!
Here it is!
I'll need to clean up the edges around it a bit, but I'm really happy with how it turned out. After weathering it's going to be even better!
I basically followed Vince Venturella's guide on how to do detail freehand. The first point is to just be brave and go for it; errors will happen but they are easy to fix. The second is to give all areas adequate attention in parallel, instead of focusing on one part at a cost of another.
In my case, it meant:
- Iterating on the sketch on paper
- Moving it to the model with a pencil
- Outlining it with a brush
- Doing base colors and transitions
- Fixing up things and making things more precise.
I used a fairly normal NMM gold palette - FW Sepia ink, Vallejo Game Air Leather Brown and Bonewhite, and white ink for highlights.
Anyway! Here are some additional pics I took while working on this. If you have additional advice to improve on it, it's welcome!
Subscribe to:
Posts (Atom)


