Showing posts with label Tacticals. Show all posts

Sunday, December 10, 2023

Legions Imperialis Iron Warriors Rhinos Done!

Hello! Long time.

So Legions Imperialis is out and I'm all over it. Iron Warriors for now, but I'll follow them up with a loyalist Solar Auxilia army and Legio Ignatum.

For these I went a bit overboard and designed/printed some Siege Tyrant missile racks to put on the terminators. I'll upload the STL at some point. These were printed with 25nm layers, I don't think 50nm would have cut it.

So I painted a few units to start with, and want to share them and write down the recipe. I'm sure to forget it otherwise! So here's the recipe. As always, it does all the rough and high impact things first, and then just goes into more and more detail to focus and neaten up the paint job.

Step 0: Build

  • I plastic-cemented the minis to their bases before painting. This is to make sure I'll be able to pull the magnetized bases and not have anything break. Had I superglued after painting, it's possible that the models would rip paint and detach. I found it to work just fine, it's easy to reach models when they're on the base like that, and they're easy to hold as well.
  • Wood glue random tiny basing rocks work to create debris
  • Prime in black
Step 1: Base colors
  • Controlled/light drybrush of Scale75 Thrash Metal
  • Paint the base for models that have it. Over black, apply some Scale75 Gray Graphene, and drybrush Artic Blue towards the edges.
  • Pick out brasses in Scale75 Pure Copper
  • Pick out black areas in Scale75 Petroleum Gray
  • Paint chevrons
    • Paint a stripe or an area using a mix of ProAcryl Bold Titanium White, ProAcryl Warm Yellow and Kimera Diarylide Yellow. One or two passes should be enough.
    • Glaze ProAcryl Warm Yellow into white where it gets brighter, Diarylide Yellow where it gets dark.
    • Paint chevrons using ProAcryl Pure Black. Use a good brush with a good tip, and don't go too small, or the paint will be drying on you. You need a steady hand and a good brush, not a small brush. I used a ~newish Raphael 8408 #2. Move fast, make mistakes and fix them up later with the yellows above; it's faster to make a mistake and fix it then go super steady, stress out, and then make mistakes anyway.
    • Stipple Citadel Gore-Grunta Fur Contrast in places to add texture and hide rough blends.
  • Apply transfers. MicroSet and MicroSol did good work, as usual. I didn't varnish all over before applying them because I don't want to affect the metal finish. I only varnished over the transfer, in satin, and you can kinda tell the difference but only if you look.
  • Spot detail!
    • The reds were done in ProAcryl Bold Pyrrole Red, mixed with black or some ivory where it needs to go down or up.
    • The "leather" on the terminators was ProAcryl Light Umber, and after weathering, roughly accented in ProAcryl Ivory. I felt like a light color worked as an accent color, given how dark the models are. Otherwise a darker brown would have been be more appropriate
    • ProAcryl Sky Blue on the power swords, mixed with ivory or black
    • The lights on the rhinos I'm not sure anymore, I think it was just ivory.
Step 2: Weathering
  • AK Streaking Grime for Panzer Grey all over, applied thin, and then removed by a drybrush that's had some white spirits. Because I didn't varnish, I had to go gentle or risk stripping paint. It did start to give in places but it's ok, call it additional weathering. It's only black underneath anyway.
  • AK track wash over tracks
  • When those above are dry, AK Light Dust Deposits applied very thin and glazed in places towards the bottom. Stipple on the base for models that have a base.
Step 3: Neatening up
  • Identify volumes. Line/glaze Musou Block between them; it's really strong and works to accent these models. For example, on most marines, I have a line of Musou Black between their heads and shoulder pads, the backpack, between the torso and the weapon. Just to separate shapes.
  • All black areas really need a highlight using a mix of Petroleum Grey and white. They get lost otherwise. I don't mean an edge highlight, I mean slapping paint on top to define shapes. Look at the tops of bolters for example.
  • Edge highlight in Scale75 Thrash Metal where the weathering ended up too strong.
  • Stipple Vallejo Metal Color Chrome where I want something to pop. Heads, tops of backpacks, bits on weapons and arms. In the terminator missile racks I used ProAcryl Ivory actually, silvers weren't producing an outline that's readable enough.
 That's it! For now at least. Thanks for looking.


Saturday, April 1, 2017

Tacticals Space Marines Done!


They're done!

This was a very fast paintjob. Well, relatively speaking; about 90 minutes per guy. And it shows from up close, but not from afar. They look great as a squad on the tabletop, and that's what I wanted to see with this army: drastically less time per model compared to my Necrons.

I took these pics indoors - sunny outside wasn't working out for these guys. I wanted them to look gloomy. I used a cloth math as the background and did more editing than before. The pics look extremely good. And I took them with my phone!

Now I'll stop blabbering. Thanks for looking!


Monday, March 13, 2017

Magnetizing Marine Weapons

First I want to apologize for the pics here. I took them over a month ago on the phone and didn't check the image quality. Things are a bit out of focus, but I don't have pictures any better than this.

For my first squad of Tacticals, I didn't really know what to assemble. Space Marines have way more options than Necrons. So magnetizing is an obvious way to go, however, while magnetizing Necrons I found that there's a limit to how much magnetization makes sense. Specifically, once there's a single way to grab the model, you've gone too far. If you grab the model wrong and his limbs start popping off, that's too much.

I eventually decided to give my Sergeant a combi-weapon (magnetized to all 4 options), and to magnetize one guy with all special weapons (again, all 4). I didn't include a Heavy weapon because I'm thinking I'd like my squads to move and shoot, and grav is a bit cheesy. I didn't have a grav gun anyway, and I can always one-off a Marine with a grav gun if I really want to spend some points on not being fun to play with.

So, here's how I magnetized the Sergeant's weapon:


Pretty straightforward and it works fine. I used 2mm x 1mm round magnets. The top sides of the weapon cannot slide sideways to the left hand side of the weapon, just the right; so I put the magnets at a slight offset to make the magnets pull the top edge in such a way to keep it stable.

The Special Weapons guy was a bit more work. Same magnets, but this time one pair for each arm:


Turns out that the 1mm thick magnet can fit in their palm without breaching the other side of the hand. The weapon rests very firm when put in, enough to lift the model by the weapon.

So much for now. I'm getting close to finishing the first ten, really looking forward to taking some nice pics and starting to work on a Rhino.

Thanks!

Sunday, February 5, 2017

Truescaling and Reposing Adventures!

This is an SM post, although I've been working on my Necrons some more since the last post. I have a unit painted and ready for a photo session, although I'm waiting for weather to clear up first.

So, Space Marines! They squat and look silly. Kinda like my Necron Warriors, their legs need to be reposed, and they need it bad.

However, as you may or may not have noticed, Space Marines also have short legs. And no waist. Their hips extrude right from their rib cage. Maybe that's why they're squatting? I don't know.

Inspired by this blogpost, I got 1mm thick plasticard to extend their legs at the shin and at the thigh. I used the same plasticard at the waist.


As you can see, I used Milliput to try to fill up the gaps and make the extension smooth. That didn't work out well for me. The plasticard was hard to file compared to the plastic. I was very hard to achieve a flat surface, and as of right now, this model is still lumpy. Back to the drawing board.

Next up, I tried to make sure that the extension is as seamless as possible, I cut the legs at flat areas for the armor (as much as possible). I also made the plasticard bit smaller than the outer diameter of the armor, so I can use Milliput or something like that to fill up the gap and sand the extra material smooth.


This time things looked much better. I could use Milliput to properly pad the legs!


I'm pretty happy with how they turned out - for now. When I start painting, it will be much easier to see if the end surface is lumpy in any way. And while I really tried to sand things as best as possible right now, I expect to be stripping primer, sanding, and repriming when the time comes to paint.

Sunday, January 22, 2017

Converting Space Marine Helmets to Crusader Helmets

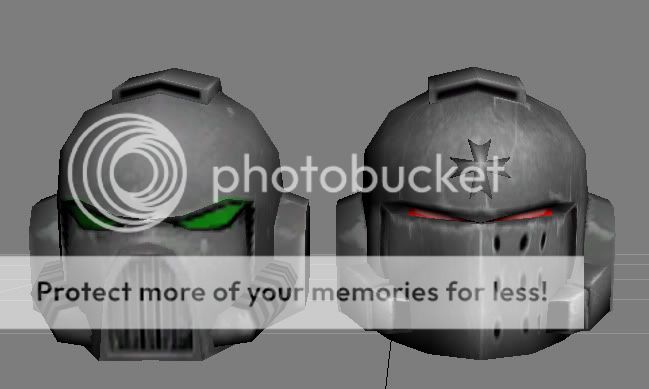
One of the more iconic features of a Black Templar army are their helmets. I couldn't find a specific name for them, so let's call them crusader helmets. Here's one!


Here's what I mean. A default helmet is to the left, and a crusader helmet to the right:


It's very much like a Grey Knight helmet, but without the excessive underbite that Grey Templar helmets have.

The Black Templars conversion kit comes with a few helmets like this, but they're not cheap on bits stores. Similarly, Forgeworld offers some (look at 30k Imperial Fists), but it's not cheap. So convert your own! It's basically free and looks great. It's not that much work either.

It's a pretty simple conversion. All you need is a normal helmet, some milliput, and some delicate files. I don't think green stuff would work as well as milliput because it's not as sandable, but I didn't try.

The steps are straightforward. Take a default helmet:


First cut the helmet's mouth grill off. The best way to cut that I found is to make a vertical cut that goes as deep into their face as possible; typically just until you touch any hoses or other detail that goes along their jawline. Then grind their cheekbones down a bit, because after this cut, there'll be a bit of a protrusion just under their eyes that used to follow the curve touching their mouth grill. That curve will be gone. You can see traces of sanding on the second and fourth pic below:


Finally, use some milliput. Try to just follow the curve of their cheeks and end up in a straight line down the middle of their face. I try to keep the upper edge of the extension flat. I curve their chin a bit, initially accidentally but the look worked. I suggest using clay shapers to achieve straight surfaces and blend the extension into their cheeks. That's hard to see on this guy considering his face already has a lot of detail, but the more plain helmets really benefit from clay shapers.


You may engrave something over the extension as it dries. I added some holes on a few, and I'd like to try making vertical grills on a few as well.

Finally, when it's dry, sand it smooth. These pics were taken before that step, sorry.

But that's it! Pretty easy. Now to do this for every single one of them...