Monday, October 2, 2017

Fire Raptor Assembled!

The Fire Raptor is done and ready to be painted. This was a lot of work!


First off, my Forgeworld kit was terrible. I can deal with mold lines, but I had some extremely bad mold slips in there too. The front piece that surrounds the Avenger gatling cannons, the top part of the chassis near the end of them model, and the angled stabilizer wings above the engines, were in terrible shape. After fixing them, if you line them up, you can see that they're not equal anymore, from all the material I had to cut off. But it's hard to tell with a naked eye and that's good.

I know that they say that Forgeworld offers excellent customer service, but it would take forever for replacement parts to come to me. I opted to just do the best with what I got instead. Sadly I don't have any pics of fixing them up.

The gatling gun panel was seriously misaligned, so I had to sand its edges down on both sides and practically rebuild its sides and integrate it into the model. There's the end result. It looks a bit rough but if reels smooth to the touch. I think it'll be fine after priming. Otherwise I can just go back to it, sand some more, and re-prime until fixed.


I didn't glue the cockpit mask to the model because of the acrylic glass that I don't want to risk getting any paint on. I'll probably glue that on after painting the rest of the model.

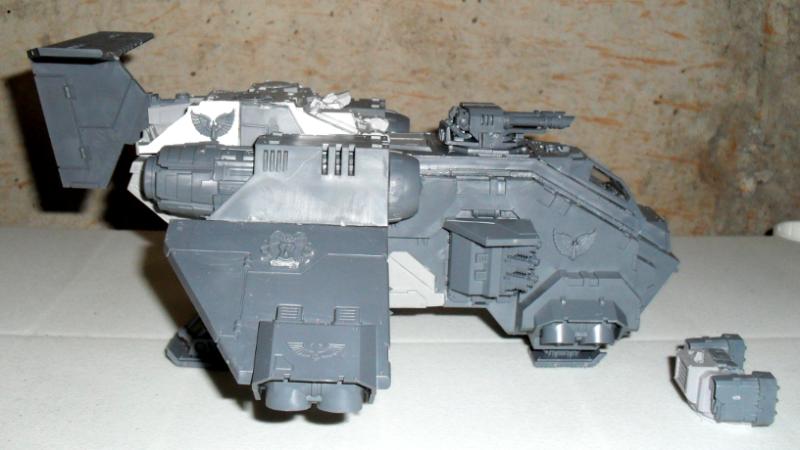
I didn't like the normal feet that the Fire Raptor kit comes with. They're long and spread apart. I wanted the model to keep a lean profile.

So I used the plastic feet that come with the Storm Raven kit instead of resin parts. I shortened them to make the model rest very low against the floor, and rear legs are pointing straight down instead of to the side, compared to the stock model. I'm happy with how this turned out.


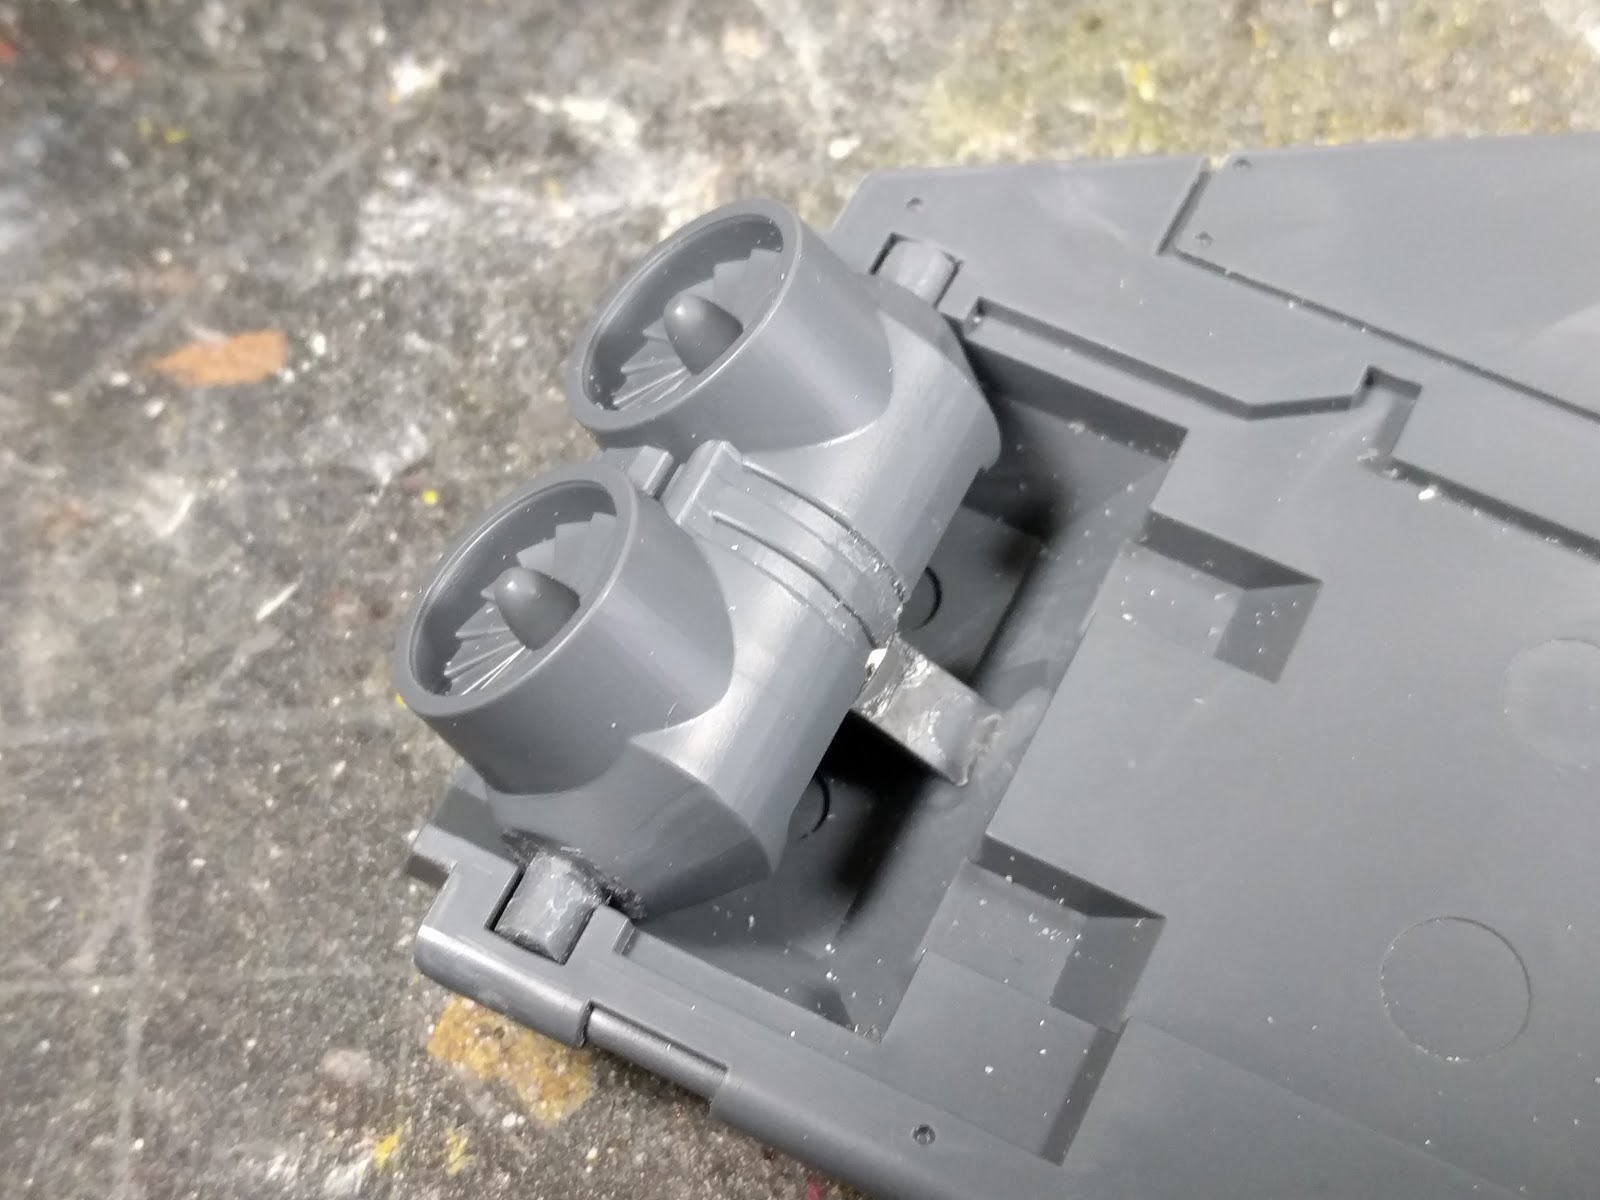
Of course, both weapon turrets are magnetized. I drilled holes in the turret and used magnets as pins that align the weapon a bit better, besides 6 5x2mm magnets in each turret that keep the weapons firmly in place.

Note that one of the Heavy Bolter weapons has a lot of Milliput (the white stuff) in the third picture below. That weapon came to me hollow. There was a thin, translucent resin shell giving it shape. Whoever was pouring resin there didn't see a massive air bubble. I just filled it with Milliput.


Wing weapons are magnetized too. While the official rules give you the option of equipping your Fire Raptor with missiles or lascannons, the kit doesn't come with lascannons. Only the Storm Eagle kit gets lascannon bits. I don't know what's up with that. Anyway, I designed and 3D printed some lascannon bits to use.


Finally, the wings can be removed, as well as the little stabilizer thing on the top of the model. For easier transport.


This part I'm not too happy with. Instead of buying huge magnets that will have the strength to keep the wings tight to the model, I just used multiple stacks of normal modelling magnets (up to 6mm big). This worked out but it looks very messy and, while the wings don't move, I'd like to have a stronger hold in there. I've since ordered some very strong rectangular magnets - plates that are 20x10x2mm. I wish I had used those. Oh well.

That's it. Can't wait to get started with this thing, I've never painted anything nearly as big. This thing makes my Monolith look like a joke. We'll see how it goes.

Thanks for looking!

Monday, September 18, 2017

Custom-cut Resin Leviathan Dreadnought Base


I'm using these bases for my army. I love their design and I think it compliments the Black Templar look well. However, they don't come round in sizes big enough for a Leviathan Dreadnaught.

So I got the idea to buy a bigger base and cut it down to size. Should be easy, right?

After asking around for help online and locally, a friend stepped in. Warren did this for me and he wrote a little post on how he did this, take a look!


There's even a little clip on how the resin base got cut. I couldn't link to it directly, but here's what Warren said:
I mounted the base on small backer plate in a lathe, using some
double-sided tape. This particular base has some writing and rocks /
rubble, so keep that in mind when figuring out where the center should
be.
I then plunged from the face at a relatively low RPM, using a (cheap)
carbide single point threading tool to cut to diameter and get the
bevel. The plastic / resin turned really easily, and came off in
really long, soft ribbons, not dust. I ended up using a shop-vac to
suck these off, just so I could easily see the work. The surface
finish was good, with no melting or chatter.
Anyway, that's it! Here are some more pics. Thanks for looking, and thanks for doing this Warren!


Monday, September 11, 2017

Fixing Storm Raven exhaust Rotation!

Hey, here's a weird one. So you know those little stabilizer jet exhausts that come with the Storm Raven kit? At the tip of the wings and just under the cockpit? Turns out they can swivel.

It's a bit difficult to see, but the two models below show it okay. The first Storm Raven has 4 jet exhausts pointing sideways (towards the camera), and the second's exhausts are pointing down:


Well I hate stuff like this! Assemble them too stiff and moving them becomes grindy. Assemble them too loose and they start to rattle and move on their own. The best solution might be to just fix them in a certain position.

Unless you use magnets to keep the little things fixed in their extremes? And then you can switch between the two with a light touch and a satisfying click? Oh yes.

Use a sprue bit to create a girder down the middle of the exhaust bit and use it as a platform to add two magnets. The magnets should have the same orientation with regards to polarity. I used 3mm magnets.


Now use a sprue to place a magnet inside the wing. I used a 6mm magnet here:


This might take a few tries, but align the magnet so that it hits against the sprue when the exhausts are pointing sideways. If you place it correctly, the big magnet will catch either magnets as you rotate the exhaust:


And here's how it looks like assembled:


It works great. However you have no idea how satisfying it is to switch the exhausts between the two configurations. You just nudge it and the other magnet picks up on it and snaps it in place with an extremely satisfying click. This is worth doing just for the click, trust me!

That's it. Thanks for reading!

Also here's a teaser of what I'm working on:


Tuesday, August 29, 2017

Custom Biker Wheels!

So I've been looking into Space Marine Bikers lately. I like the idea and I'd like to have some of my own, although I'd prefer if there were a melee option.

But! The models are ancient and awful. They need a lot of work to look good. So I better start with something! And here's the inspiration:


As usual, I had them printed at Shapeways. I'll be putting them online for sale once I have the design finalized; this one's good but it'll need a bit more work. The print is a bit rough on the sides but that will be easy to sand.

My plan is to get Forgeworld Outrider bits, extend the plastic bits a little bit to make the bike longer, truescale the riders and move their butts backwards, extend their torsos and lean them forward, and use custom wheels. We'll see how it turns out once I have the models in hand.

As for why I haven't been posting - I've been painting a lot but have not been doing any photo sessions. Taking nice photos and editing them takes quite a few hours that could be spent on modelling and painting! I converted and painted quite a lot since my last post. I should probably take a family photo one of these days.

Thanks for looking!

Sunday, July 2, 2017

Magnetized and Converted Stormhawk/Stormtalon

Hey, sorry for the long hiatus. I actually have several units painted that I didn't post pics of, I just didn't get around to taking pictures and editing. It's work and I'd rather paint! Anyway, this is worth posting about.


Here's the end result. This is the same model, of course. Note that I'm holding them by the wing - even though they're held together by magnets, they're very sturdy.


So here's how that works. The main chassis is littered with magnets. There's two 6x1mm Neodymium magnets on the roof to hold the cabin, two more just under the wing mount to hold the floor, and 6x4mm Neodymium magnets in the center of where the Stormtalon engines attach.


Wings have 6x4 magnets each. These magnets extrude and actually enter the rotor hole that the Stormtalon engines hold onto. If you have the model in your hands it will be obvious how this works.


Each cabin has two 6x1mm magnets on the roof and two 5x2mm magnets on the nose. These attach to the floor piece.


Finally, the floor piece has two 6x2mm magnets under where the wings would be, and a circular steel plate on the front where the tip of the cabin attaches.


I cut the little cheek extrusions from the floor piece to move the two weapon platforms closer to the model. The weapons that attach to it are magnetized: this can be a bit flimsy in case of the Lascannon as there's not enough surface area to mount strong magnets there.

I also modified all bottom-mount weapons to be very flush to the body, and they attach to the little steel plate on the bottom of the body.

Finally, I extended the tail piece just like this guy did. Kudos for the idea! It's brilliant. Look at his blog for instructions, I'm not stealing the thunder for this one.


And that's it! The model is very strong when put together. The chassis holds the cabin and the floor piece, the cabin holds the floor piece too, and it takes some muscle power to separate them. The cheek parts of the chassis are flexible so attaching and reattaching is very easy, apart from the muscle required. The wings, similarly, aren't going anywhere once they snap in.

I think I'll glue the floor piece to the acrylic stand, just to keep that from moving. Put it in some nice dynamic angle or something. Also, considering that this version of the model is significantly longer, I'll need to flip the stand so that it's leaning forwards. It looks like it'll look good.

So much about that! Thanks for looking.